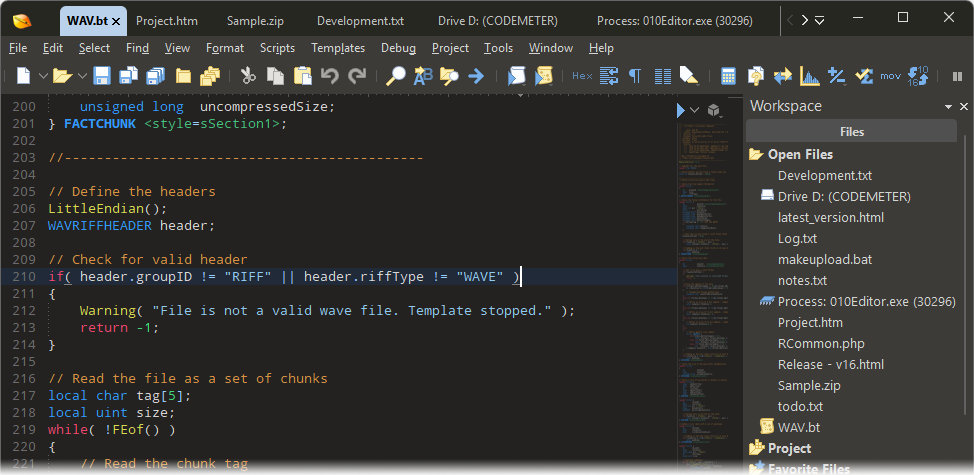
Features real-time syntax parsing using Tree-sitter.
Edit text files, XML, HTML, Unicode and UTF-8 files, C/C++ source code, PHP, etc.
Unlimited undo and powerful editing and scripting tools.
Huge file support (50 GB+) and Column mode editing.
010 Editor
World's Best Hex Editor
Unequalled binary editing performance for files of any size.
Use powerful Binary Templates technology to understand binary data and
edit 300+ formats.
Find and fix problems with hard drives, memory keys, flash drives, CD-ROMs,
processes, etc.
Digital forensics, reverse engineering and data recovery.
Reverse Engineering
Binary format analysis.
Disassembly of X86, ARM, MIPS, PowerPC, SPARC, SystemZ and XCore.
Interpret binary data in many different formats.
Forensic Analysis
Digital forensics.
Malware analysis.
Powerful search tools and visualizations.
Analyze memory and processes.
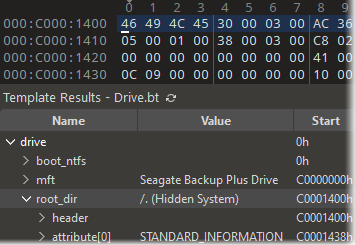
Data Recovery
Low-level hard drive editor.
View NTFS, FAT16, FAT32, exFAT, and HFS drives.
MBR and EFI partitions.
View directories, file blocks and slack space.
For a more modern, supported experience on Windows, consider using (comes with Wireshark) or running WSL2 with native tcpdump . But for quick, lightweight captures, windump.exe still works fine.
tshark -D # List interfaces tshark -i 2 # Capture on interface #2 tshark -i 2 -c 10 # Capture 10 packets | tcpdump | tshark equivalent | |---------|------------------| | tcpdump -i eth0 | tshark -i 2 | | tcpdump -c 5 | tshark -c 5 | | tcpdump -w file.pcap | tshark -w file.pcap | | tcpdump -r file.pcap | tshark -r file.pcap | | tcpdump port 80 | tshark -f "port 80" (capture filter) or tshark -Y "tcp.port==80" (display filter) | 💡 Pro tip: tshark supports display filters ( -Y ) which are more powerful than capture filters. 4. Method 3: Using WSL (Windows Subsystem for Linux) This gives you real tcpdump on real Linux kernel inside Windows. Step 1: Install WSL2 # Run in PowerShell as Admin wsl --install Reboot if needed. Install Ubuntu from Microsoft Store. Step 2: Install tcpdump in WSL sudo apt update sudo apt install tcpdump Step 3: Capture traffic from Windows interfaces WSL2 shares the network adapter with Windows. Run:
Analysis Tools - Drill into your Data
A number of sophisticated tools are included with 010 Editor for analyzing and editing binary files:
Full Find, Replace, Find in Files, and Replace in Files functionality for many different data types.
Powerful Binary Comparison tool for analyzing byte-by-byte differences between two files.
Visualize data with the Mini Map or the Visualize tab.
Computes Check Sum/Hash Algorithms including CRC-16, CRC-32, Adler32, MD2, MD4, MD5, RIPEMD160, SHA-1, SHA-256, TIGER, etc.
Disassembler for X86, ARM, MIPS, PowerPC, SPARC, SystemZ and XCore.
Use the Histogram tool to count and visualize byte occurrences.
Scripting - Automate your Editing
Simple or complex editing operations can be automated using a syntax similar to C/C++.
Features over 350 different functions for operating on data.
Integrated with Binary Templates to intuitively edit files. Simply assign to variables defined in a Binary Template to modify a file.
Scripts may be shared and a list of scripts for download is available in our Script Archive.
Run scripts from the command line with no user interface for batch processing.
Download a free 30-day trial for Windows 11/10, macOS, or Linux. Try 010 Editor and
we think you'll agree that 010 Editor is the most powerful of all hex editors available today.
For a more modern, supported experience on Windows, consider using (comes with Wireshark) or running WSL2 with native tcpdump . But for quick, lightweight captures, windump.exe still works fine.
tshark -D # List interfaces tshark -i 2 # Capture on interface #2 tshark -i 2 -c 10 # Capture 10 packets | tcpdump | tshark equivalent | |---------|------------------| | tcpdump -i eth0 | tshark -i 2 | | tcpdump -c 5 | tshark -c 5 | | tcpdump -w file.pcap | tshark -w file.pcap | | tcpdump -r file.pcap | tshark -r file.pcap | | tcpdump port 80 | tshark -f "port 80" (capture filter) or tshark -Y "tcp.port==80" (display filter) | 💡 Pro tip: tshark supports display filters ( -Y ) which are more powerful than capture filters. 4. Method 3: Using WSL (Windows Subsystem for Linux) This gives you real tcpdump on real Linux kernel inside Windows. Step 1: Install WSL2 # Run in PowerShell as Admin wsl --install Reboot if needed. Install Ubuntu from Microsoft Store. Step 2: Install tcpdump in WSL sudo apt update sudo apt install tcpdump Step 3: Capture traffic from Windows interfaces WSL2 shares the network adapter with Windows. Run: